AI video model library
Nano Banana Pro Prompts for Product and Fashion Photos
Fourteen copyable Nano Banana Pro prompts written for sellers, not wallpaper makers. Each one says what the shot is for, what to attach, the settings to use, and the single failure most likely to cost you a return or a rejected listing.
By Drizzle team
How to use these prompts
Replace the bracketed parts and the example product with your own, attach the references in the order listed, and generate one image before you batch. Every prompt states what must not change (color, closures, label text) before it describes the scene. That order matters more than adjectives.
Nano Banana Pro is Google's Gemini 3 Pro Image model. In Google's API it accepts up to 14 reference images (up to 6 objects, 5 characters and 3 style references, with 5 at high fidelity), outputs 1K, 2K or 4K, and supports ten aspect ratios from 21:9 to 9:16. Every output carries an invisible SynthID watermark.
In Drizzle, Nano Banana Pro is the default image model. You can attach up to four reference images per image and choose 9:16, 16:9, 1:1, 3:4 or 4:3, or match the input image. The Lite plan includes 1,500 Nano Banana Pro images per billing month; other plans include a daily allowance. Try a prompt in Drizzle.
Clothing on a model
Garment-to-model prompts work best when the prompt names the details that must survive: color, print placement, closures, pocket count and length. Put the garment photo first in the reference order, and keep the rest of the styling plain until the garment is right.
Flat-lay to on-model catalog shot
Your first on-model image when you only have a flat-lay or hanger photo of the garment. Gives a clean, full-length view for a product page or a first ad test.
Attach: Image 1: the garment laid flat or on a hanger, front side. Image 2 (optional): the back.
Dress a fictional adult model in the exact garment from image 1. Keep its color, print placement, collar shape, button count, pocket count and hem length unchanged. Use image 2 only for the back of the garment.

The model stands facing the camera in a seamless warm-gray studio, weight on one leg, arms relaxed at the sides so both sleeves and the side seams stay visible. Full-length framing with a small margin above the head and below the shoes.

Soft key light from front-left, gentle fill from the right, no hard shadows across the fabric. Style the rest plainly: straight dark trousers and white sneakers, no jewelry, so nothing competes with the garment. Natural skin texture, ecommerce catalog photograph, fabric weave in sharp focus.
- Aspect ratio:
- 3:4 (portrait product pages)
- References:
- 1–2 garment photos
- Model:
- Nano Banana Pro
- Re-roll if:
- the fit changes between attempts
Check before you use it: Count buttons, pockets and stripes against the flat-lay. On-model generations most often shorten the hem, add a chest pocket, or straighten a deliberately boxy cut.
Matching back view of the same model
A second listing image that keeps the model, lighting and garment from the approved front shot, so the gallery looks like one shoot.
Attach: Image 1: your approved front on-model image. Image 2: the real back of the garment.
Same fictional model, same studio, same lighting and same outfit as image 1. Turn her so her back faces the camera, head turned slightly over the left shoulder so the profile is visible but the face is not the focus.

The back of the garment must match image 2 exactly: the yoke seam, the print or logo position and the hem shape. Do not mirror the front design onto the back. Hair pulled to one side so it does not cover the collar. Full-length framing at the same camera height and distance as image 1.
- Aspect ratio:
- Same as the front shot
- References:
- 2 (approved front + real back)
- Order:
- Approved model image first
Check before you use it: A back view invented from the front is the classic failure: a front logo copied onto the back, or a zip that should not exist. Compare against the real back photo, not memory.
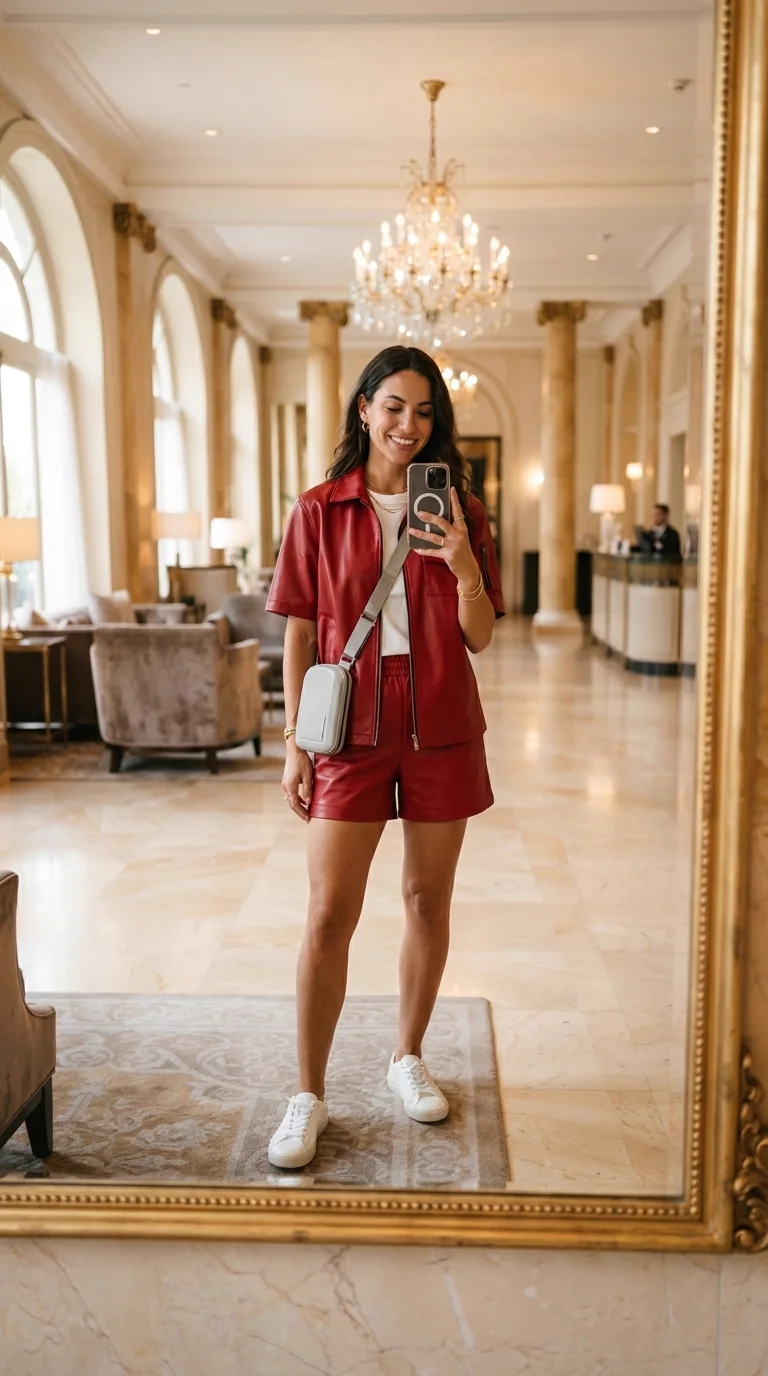
Mirror selfie outfit shot (UGC style)
The casual "fit check" frame that performs as a TikTok Shop or Reels cover and as the start frame for a short video.
Attach: Image 1: the outfit photo (all pieces visible). Add a separate photo for any bag or shoe that must match.
Vertical phone-camera mirror selfie. A fictional woman in her late twenties stands about two meters from a tall floor mirror, wearing the outfit from image 1 unchanged: [top], [bottom], [bag or accessory].

She holds a phone in a plain dark case at chest height, to one side, so it never covers the neckline, a logo or the bag. Relaxed, slightly off-center pose, small natural smile.

Setting: a bright hotel lobby with a marble floor, warm lamps and soft window light from the left. Slight wide-angle phone-lens look, realistic reflections and a faint smudge on the mirror glass. Full outfit visible from collar to shoes. No captions, no text overlays.
- Aspect ratio:
- 9:16
- References:
- 1–3 (outfit, then accessories)
- Use next:
- As a video start frame
Check before you use it: Look at the hand holding the phone: it hides necklines and logos more than anything else. Also decide whether reflected text should read backwards (realistic) or forwards (legible); you cannot have both.
One garment on three body types
A size-inclusive set for a product page or carousel, showing how drape changes across bodies.
Attach: Image 1: the garment. Write the real size worn by each figure in the prompt if you know it.
Three separate full-length studio photographs, side by side with a thin white gap between them. Each shows a different fictional adult wearing the exact dress from image 1: a petite woman, a woman with a straight build, and a plus-size woman. Same pale-beige backdrop, same soft front lighting, same camera height (waist level) in all three.

Keep the dress identical in color, neckline, sleeve length and print scale on every body. Let the fabric drape naturally to each figure rather than reshaping the dress. Neutral standing poses, arms away from the waist so the silhouette is readable.
- Aspect ratio:
- 16:9 (or generate one at a time in 3:4)
- References:
- 1 garment photo
- Tip:
- Generate singly if the print scale drifts
Check before you use it: Generated drape is an illustration, not a fit guarantee. Don't publish it next to size advice unless real fit photos or measurements back it up.
Lifestyle and context scenes
Context shots change the world around the product and leave the product alone. Say what stays fixed before you describe the scene, and give real dimensions whenever a hand, a body or furniture shows scale.
Flat-lay to lived-in lifestyle scene
Turns a clean product photo into context: where the item lives on a normal day. Good for secondary gallery images and social posts.
Attach: Image 1: the product photo. A second angle helps if the item has a hidden side.
Place the knit sweater from image 1 folded loosely over the back of a light oak chair in a sunlit bedroom, mid-morning. Keep the yarn color, cable pattern and ribbed cuffs exactly as in image 1.

Linen bedding slightly out of focus behind it, a ceramic mug on the side table, warm window light from the right creating soft shadows in the cable knit. Shot on a 50mm lens at eye level, shallow depth of field with the sweater sharp. Calm, editorial home-catalog mood, no people.
- Aspect ratio:
- 4:3 or 3:4
- References:
- 1–2
- Swap in:
- your own product and room
Check before you use it: Props can look like they are included in the purchase. Keep them obviously generic, and check the knit pattern did not simplify where the fabric folds.
Product held in hand, phone-camera style
A UGC-looking product close-up for ads and TikTok Shop covers, where scale matters.
Attach: Image 1: the product. State its real size in the prompt.
Close-up phone photo of a woman's hand holding the serum bottle from image 1 at chest height, label facing the camera. The bottle is 11 cm tall, so it fits between her thumb and fingertips with the cap above her index finger. Natural short nails, no rings.

Background: a softly blurred bathroom with white tiles and morning light. Slight handheld tilt, realistic phone sharpness, gentle highlight on the glass. The label text must stay exactly as in image 1.
- Aspect ratio:
- 9:16 or 3:4
- References:
- 1 product photo
- Write in:
- the real dimensions
Check before you use it: Count fingers and check the grip actually touches the product. Then check scale: without a stated size, models happily turn an 11 cm bottle into a 20 cm one.
Seasonal scene swap for one hero product
Refreshing a best-seller for a campaign moment (summer, holidays, back to school) without a new shoot.
Attach: Image 1: your approved hero product image.
Keep the product from image 1 exactly as it is: shape, color, logo position and proportions. Change only the scene around it.

Place it on a striped cotton beach towel on pale sand, late-afternoon sun from the left casting a long, soft shadow, a pair of sunglasses and a paperback partly in frame at the edge. Shot from slightly above at a 30-degree angle, the product in the left third of the frame with empty space on the right for a headline.
- Aspect ratio:
- 1:1 or 4:3
- References:
- 1
- Leave:
- negative space for copy
Check before you use it: Make sure the shadow direction matches the sun. A product lit from the right in a scene lit from the left is the giveaway that it was pasted in.
Packshots and catalog images
Packshots are where accuracy matters most, because they sit next to the buy button. These prompts ask for less creativity, not more. Compare each result with your original photo before it replaces anything.
White-background packshot from a phone photo
A clean main image when your only photo was taken on a desk or the floor. Check your marketplace's main-image rules before uploading.
Attach: Image 1: your phone photo of the product, as sharp as possible.
Recreate the product from image 1 as a professional ecommerce packshot. Pure white seamless background, the product centered and filling most of the frame, photographed straight-on at product height.

Even, shadowless softbox lighting with only a faint natural contact shadow directly beneath it. Preserve every real detail from image 1: proportions, stitching, hardware, logo and label text. Remove dust, the desk surface and any background clutter. No props, no added text, no reflections of the room.
- Aspect ratio:
- 1:1
- References:
- 1
- Then:
- compare side by side with the photo
Check before you use it: This is where models quietly "improve" products: straighter seams, a cleaner logo, a hardware finish that is shinier than reality. Your main image has to show what the customer receives.
Ghost mannequin (invisible mannequin) from a hanger photo
Gives tops and jackets a three-dimensional body shape for listings without a model or a mannequin edit.
Attach: Image 1: the garment on a hanger or flat. Image 2: a photo of the inside back neck (label area), if you have one.
Show the jacket from image 1 as a ghost-mannequin product photo: the garment filled out as if worn by an invisible body, with no mannequin, hanger or person visible. Front view, shoulders level, sleeves hanging naturally with a slight bend at the elbow.

Through the open neckline, show the inside back of the collar using image 2. Pure white background, soft even lighting, true-to-life color. Keep the zip, pocket flaps, topstitching and logo exactly as in image 1.
- Aspect ratio:
- 3:4
- References:
- 1–2
- Without image 2:
- expect an invented inside label
Check before you use it: Without a real photo of the inside neck, the model invents a label, sometimes with a readable fake brand or size. Crop it, or supply the real inside view.
Color-variant concept from one hero shot
Previewing a colorway before samples arrive, or planning which variants to photograph. A concept, not a listing photo.
Attach: Image 1: the hero product photo. Image 2: a photo of the new fabric or a color swatch.
Recolor the hoodie in image 1 to match the fabric swatch in image 2. Change only the fabric color. Keep the same model, pose, background, lighting, drawstring color, embroidery and all seams identical to image 1. The rib cuffs and hem band take the new color too. Keep the fabric texture and the shading in the folds realistic for the new color.
- Aspect ratio:
- Match input image
- References:
- 2 (hero, then swatch)
- Use for:
- planning, not variant listings
Check before you use it: Generated color is not color-managed. Before a variant image goes on a listing, compare it against the real dyed item under daylight. Otherwise returns follow.
Reflective, transparent and small products
Hard materials fail in predictable ways: reflections that show a room, glass that loses its edges, jewelry at the wrong scale. Describe the lighting setup a studio photographer would use, and the model tends to follow it.
Reflective product (steel, chrome, glossy packaging)
Bottles, cookware, watches and glossy boxes, where an uncontrolled reflection shows a room, a camera or a warped photographer.
Attach: Image 1: the product, ideally photographed in soft light.
Studio product photo of the stainless-steel water bottle from image 1, standing upright on a matte black acrylic surface. Light it like a professional tabletop shoot: two tall strip softboxes on either side create clean vertical white highlights along the edges of the bottle; black flags just outside the frame give the steel crisp dark edges.

The reflections show only the softboxes and the black studio. No camera, no photographer, no windows and no room in the reflections. A soft, blurred reflection of the bottle on the surface below. Keep the engraved logo and cap shape exactly as in image 1.
- Aspect ratio:
- 3:4
- References:
- 1
- Key words:
- strip softboxes, black flags
Check before you use it: Zoom into the curved surfaces. Look for a ghost of a person or a window, and for logos that warp the wrong way around the curve.
Transparent product (glass, clear plastic, liquids)
Perfume, serums, clear phone cases and drink bottles, where the background shows through and edges disappear.
Attach: Image 1: the product. Type the exact label text into the prompt.
Backlit studio photograph of the glass perfume bottle from image 1 on a pale stone plinth. Light comes through a white diffusion panel behind the bottle so the amber liquid glows evenly. Thin rim lights on the left and right trace the glass edges so the silhouette stays readable against the light background.

The bottle is two-thirds full, with a clean flat liquid line. The front label reads exactly "[BRAND NAME]" on the first line and "[FRAGRANCE NAME] 50 ml" on the second, in the same typeface layout as image 1. Faint caustic light on the plinth below the bottle.
- Aspect ratio:
- 3:4 or 1:1
- References:
- 1
- Spell out:
- label text in quotes
Check before you use it: Read the label letter by letter. Nano Banana Pro is strong at text, but "50 ml" turning into "5O ml" or a dropped accent still happens. Also check the liquid level matches the real fill.
Jewelry close-up on a model
Earrings, necklaces and rings, where scale on the body and stone count decide whether the shot is usable.
Attach: Image 1: the jewelry on a plain background. Image 2 (optional): a scale photo next to a ruler or coin.
Macro beauty shot of a fictional woman's ear and jawline wearing the gold hoop earring from image 1. The hoop is 25 mm in diameter, so it hangs just below the earlobe and ends above the jaw. Hair tucked behind the ear. Soft diffused window light, warm skin tones with real texture and fine hairs, shallow depth of field.

Keep the earring's metal color, the twisted texture and the three small stones exactly as in image 1. No extra earrings or piercings.
- Aspect ratio:
- 4:3 or 1:1
- References:
- 1–2
- State:
- size in mm and stone count
Check before you use it: Count stones and links, then check the size against the scale photo. Jewelry rendered too large is the most common reason these images get rejected after a customer complains.
Feature callout image with text labels
An infographic-style secondary image that explains three real features. Uses Nano Banana Pro's text rendering.
Attach: Image 1: the product. Only list features you can prove.
Clean ecommerce infographic of the backpack from image 1, three-quarter front view, centered on a light gray background. Add three callout labels with thin black leader lines pointing to the matching parts:
1. "Water-resistant 600D nylon" → the main fabric panel
2. "Padded 15-inch laptop sleeve" → the back panel
3. "Lockable YKK zips" → the main zip pull
Simple sans-serif type, dark gray, generous spacing, no icons, no badges, no extra text.
- Aspect ratio:
- 1:1
- References:
- 1
- Replace:
- the three claims with yours
Check before you use it: Every word on the image is a product claim. Spell-check it, confirm each claim is true, and make sure each line points at the right part.
Five prompt rules that matter for products
- Lock the product before you describe the scene. Start with what stays fixed: "Keep the color, print placement and button count exactly as in image 1." Google's own editing guidance uses the same pattern ("keep everything else in the image exactly the same").
- Write sentences, not keyword lists. Google's guides recommend describing the scene as a narrative paragraph. Include subject, composition, action, location and style.
- Direct it like a photographer. Lens, angle, light direction and depth of field ("50mm, eye level, soft light from the left") control the result more reliably than "high quality" or "8k".
- Give every reference a job. Say which image is the garment, which is the model and which is only for the back view. Google's tip: "Use Image A for the character's pose, Image B for the art style…"
- Put text in quotes and proofread it. Nano Banana Pro renders legible text well, but Google notes that small text and exact spellings "may not work perfectly". Every word on a product image is a claim.
What Nano Banana Pro costs per image
Through Google's Gemini API, Nano Banana Pro is billed by output tokens. That comes to a flat price per image at each size. Drizzle plans cost between $0.05 and $0.07 per credit depending on the plan (pricing); a paid Pro image in Drizzle costs 2 credits, and included allowance images cost nothing extra.
| Where | 1K or 2K image | 4K image | Notes |
|---|---|---|---|
| Gemini API (Standard) | $0.134 | $0.24 | Reference images add about $0.001 each |
| Drizzle, paid image | 2 credits (about $0.10–$0.13) | Not offered | Only when you choose paid generation |
| Drizzle Lite plan | 1,500 included per month for $20 | Not offered | Plus 300 credits for video |
Turn an approved image into a product video
A strong still is the best start frame for video. Use the approved on-model or lifestyle image as the first frame and ask for one small movement. See the Seedance 2.0 product video prompts for motion prompt structure, Veo 3 pricing for what an 8-second clip costs, or the AI fashion model generator for the clothing workflow in Drizzle.
Sources and review date
Prices and limits change often. Everything on this page was checked on November 9, 2026; confirm the current figure with the provider before you buy.
Frequently asked questions
What is the best Nano Banana Pro prompt for putting clothes on a model?
Lead with the garment details that must not change (color, print placement, closures, length), then describe a plain pose that keeps sleeves and hem visible, then the light. The flat-lay to on-model prompt above follows that order.
How many reference images can Nano Banana Pro use?
Up to 14 through Google's API: up to 6 object images, 5 character images and 3 style references. Google says it keeps 5 inputs at high fidelity. In Drizzle you can attach up to four per image.
Can Nano Banana Pro keep my product exactly the same?
Often, but not reliably enough to skip review. Compare every result with the real product. Generated images tend to tidy seams, change hardware finishes and shorten hems. Your main listing image should show what the customer receives.
Are AI-generated product images allowed on marketplaces?
Rules differ by marketplace and change. Check the current image and AI-content policy for your marketplace, and don't use a generated image to show a feature, size or color the real product doesn't have.